Seller Registration & Product Upload Guide
A complete step-by-step guide—from creating your vendor account to submitting your first product for approval.
Before you begin
- Prepare an active email address and your shop contact details.
- Prepare your SSM registration or other relevant business licence/permit.
- Prepare the business bank account details used for seller payouts.
- Prepare clear product photos, accurate product weight, price, description and stock information.
Create and activate your vendor account
Register with an active email address, confirm the verification email and sign in to the vendor dashboard.
Open the vendor login page
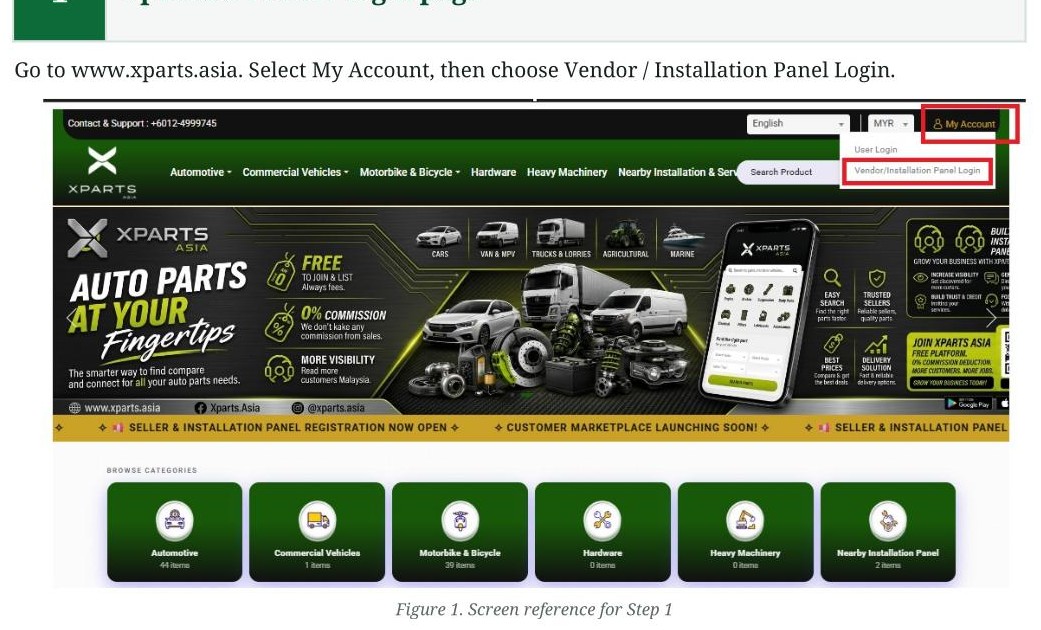
Go to www.xparts.asia. Select My Account, then choose Vendor / Installation Panel Login.
Register as a vendor
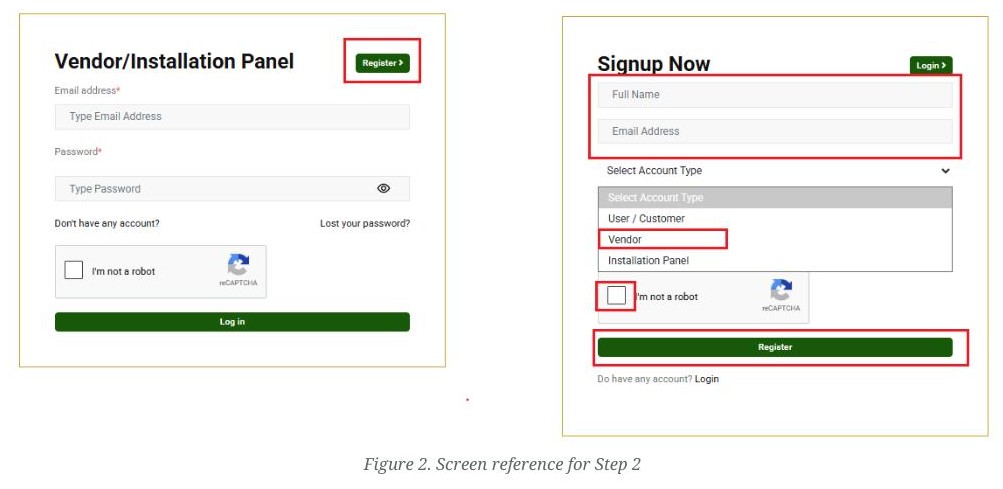
Select Register. Enter your full name and active email address, choose Vendor as the account type, complete the "I'm not a robot" check, and select Register.
Important: Use an email address that you can access immediately. All verification and account notices will be sent there.
Verify your email address
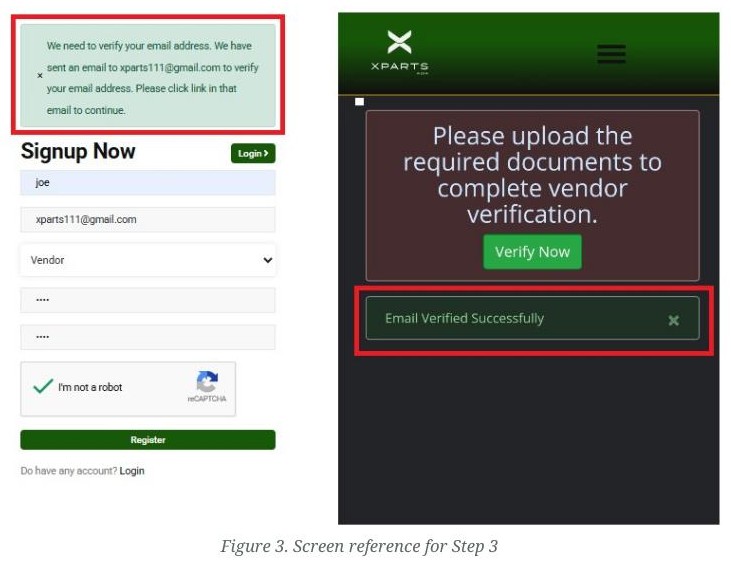
Check the inbox for the email address used during registration. Open the Xparts verification email and select the verification link to activate the account.
If you cannot find the email: Check the Spam or Junk folder and confirm that the email address was entered correctly.
Sign in to the vendor dashboard
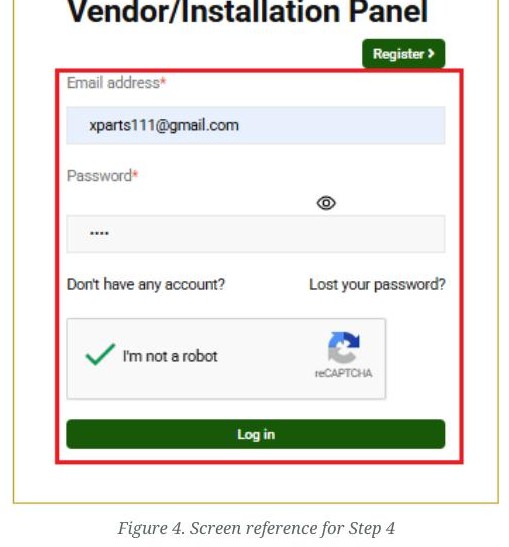
Return to the Vendor / Installation Panel login page. Enter your verified email address and password, complete the security check, and select Log in.
Complete shop verification
Add your business profile, upload the supporting documents and provide the bank details required for seller payouts.
Start shop verification
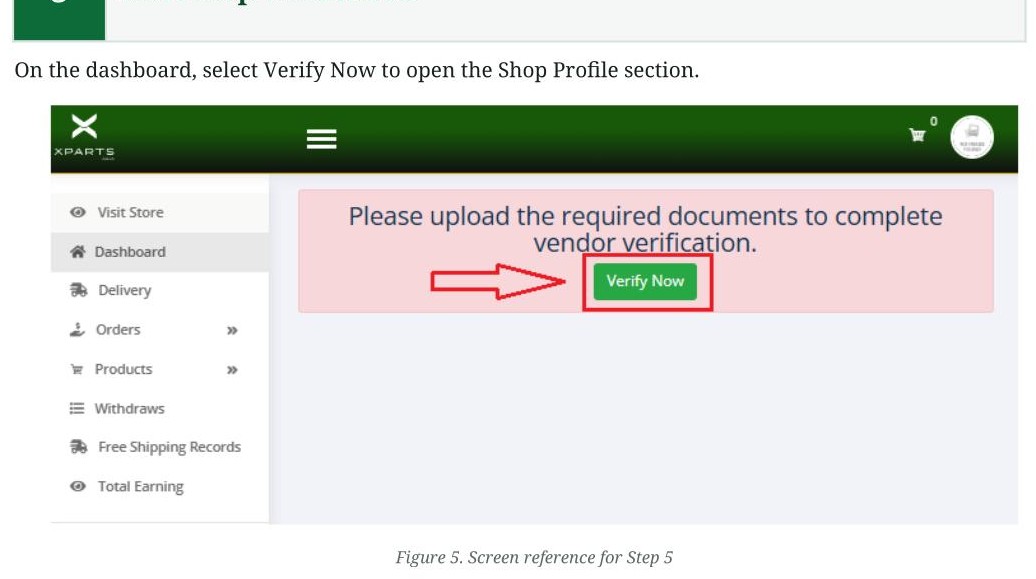
On the dashboard, select Verify Now to open the Shop Profile section.
Complete the shop profile
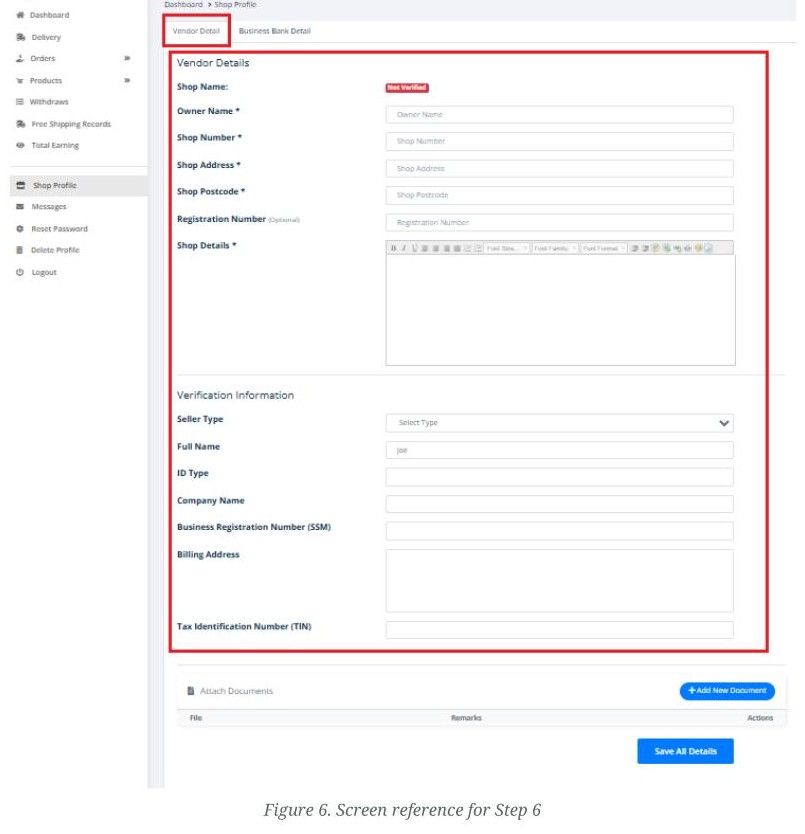
Fill in the vendor and shop information requested on the page. Complete every field marked with an asterisk (*), including shop name, owner's name, phone number, address and postcode.
Accuracy check: Make sure the information matches your supporting business documents.
Upload the required business documents
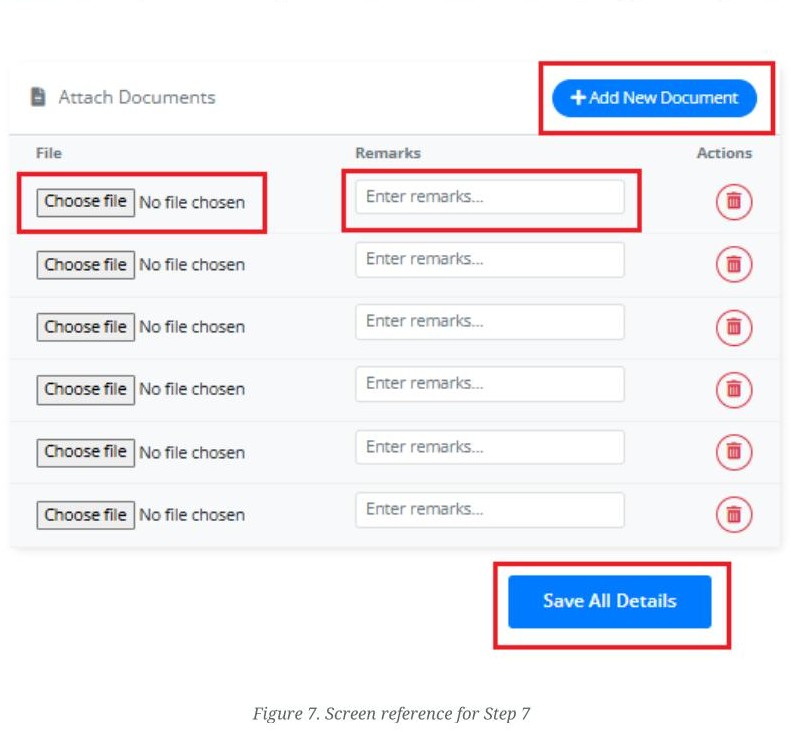
In Attach Documents, select Choose File and upload the relevant business document, such as an SSM registration, permit or licence. Add a short remark describing each file. Use Add New Document when you need to submit more than one document. When finished, select Save All Details.
Recommended: Use clear, readable PDF, JPG or PNG files. Avoid blurred, cropped or expired documents.
Add business bank details
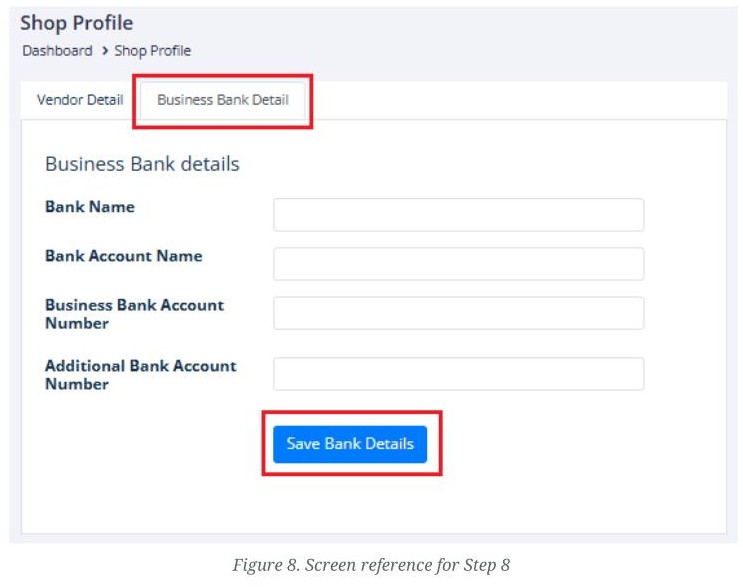
Open the Business Bank Detail tab. Enter the bank name, business bank account name and account number. Add another business account number only if applicable, then select Save Bank Details.
Payout note: The account holder name should match the registered business or authorised payout account details.
Submit the shop for admin approval
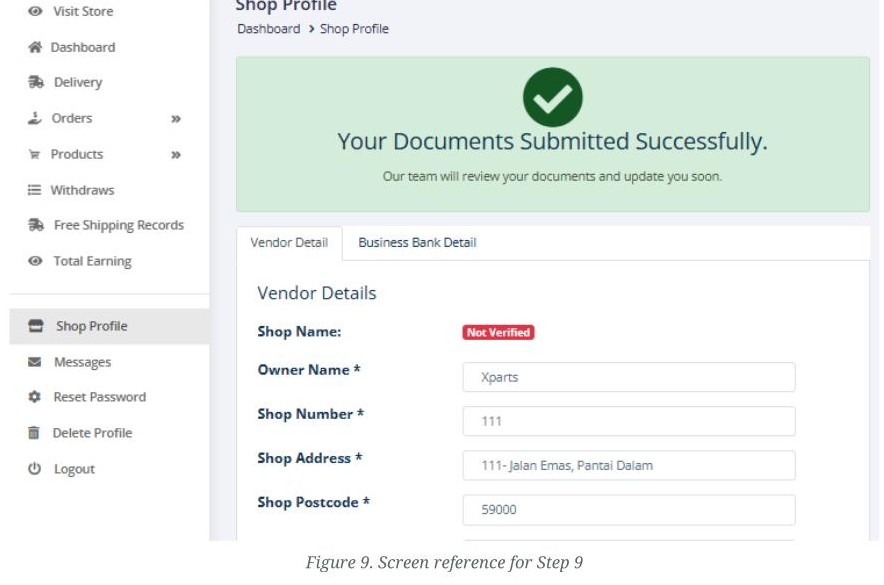
After the shop profile, documents and bank details are saved, the submission is sent to the Xparts admin team for review. The page will show that the documents were submitted successfully.
Status: Your shop remains Not Verified until the review is approved.
Choose who pays the shipping cost
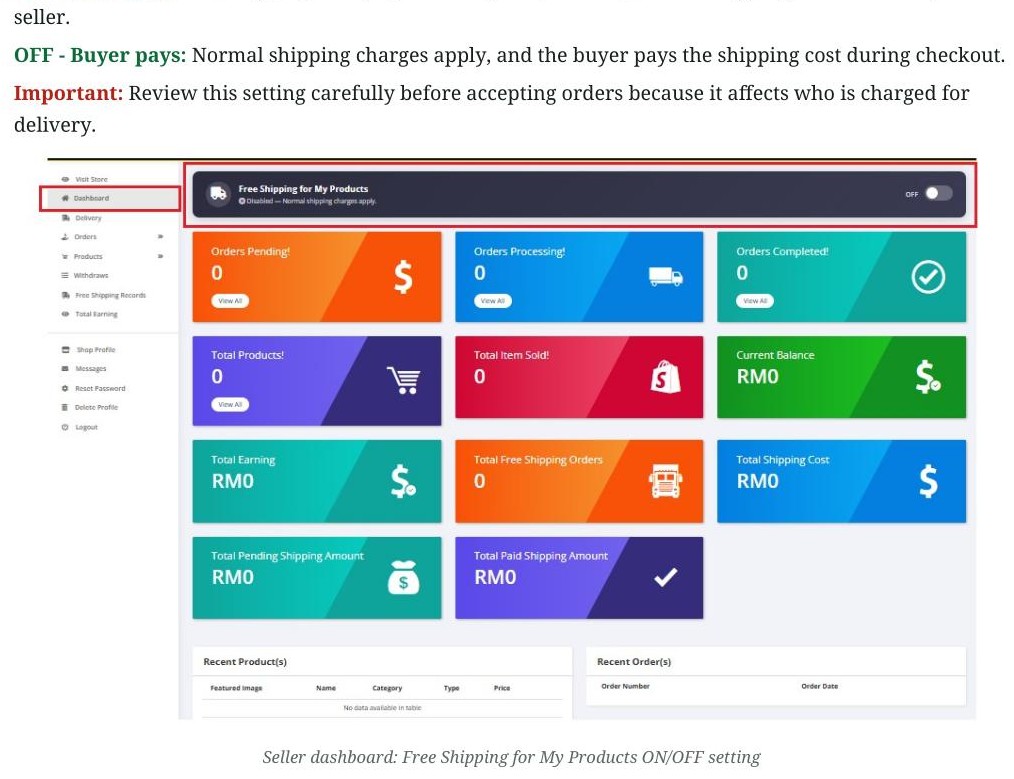
On the seller dashboard, review the Free Shipping for My Products switch. Turn it ON only when you want to offer free shipping to the buyer and agree to bear the shipping cost. Keep it OFF when the buyer should pay the shipping cost during checkout.
ON - Seller pays: Free shipping is displayed for eligible products, and the shipping cost is borne by the seller.
OFF - Buyer pays: Normal shipping charges apply, and the buyer pays the shipping cost during checkout.
Important: Review this setting carefully before accepting orders because it affects who is charged for delivery.
Confirm that the shop is verified
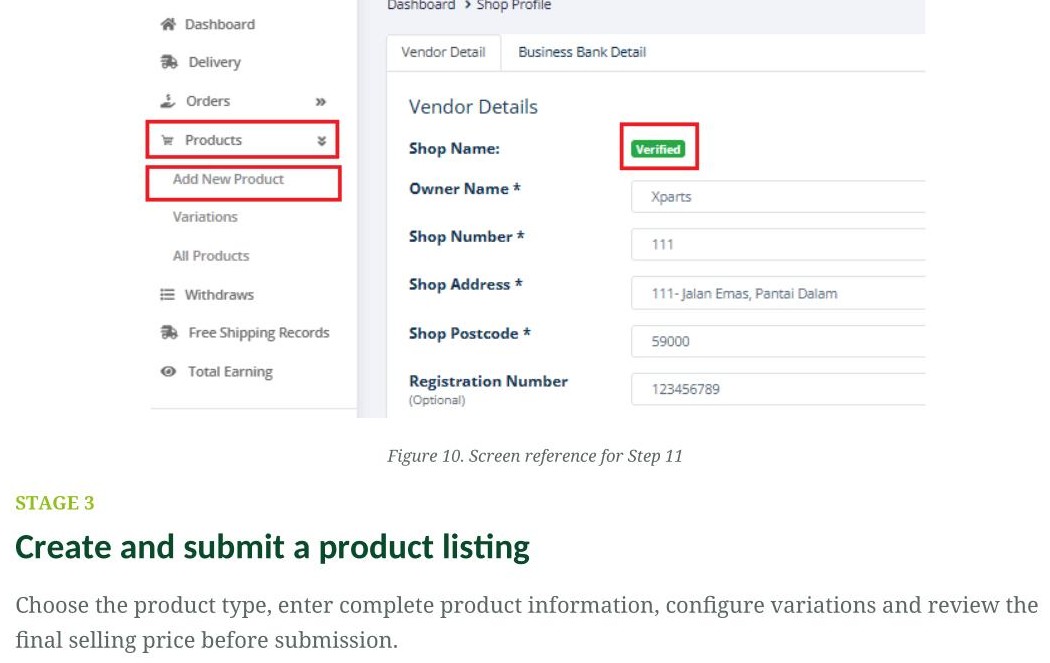
Once approved, the shop status changes to Verified. You can then open Products and select Add New Product to begin creating a listing.
Create and submit a product listing
Choose the product type, enter complete product information, configure variations and review the final selling price before submission.
Choose Physical Product
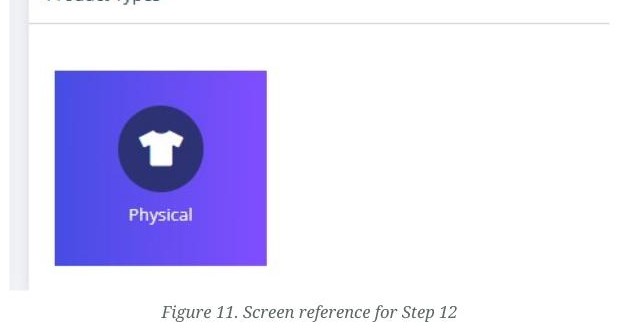
On the Add Product page, select the Physical product type.
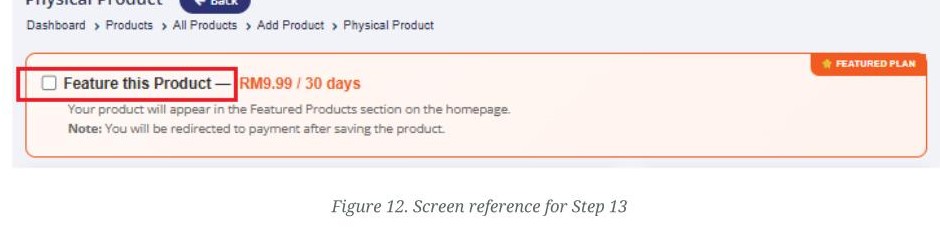
Choose whether to feature the product
If you want extra homepage exposure, select Feature this Product. This is optional and may involve the featured listing fee displayed in the portal. Leave it unticked for a standard listing.
Optional feature: Review the fee and duration shown in the portal before selecting this option.
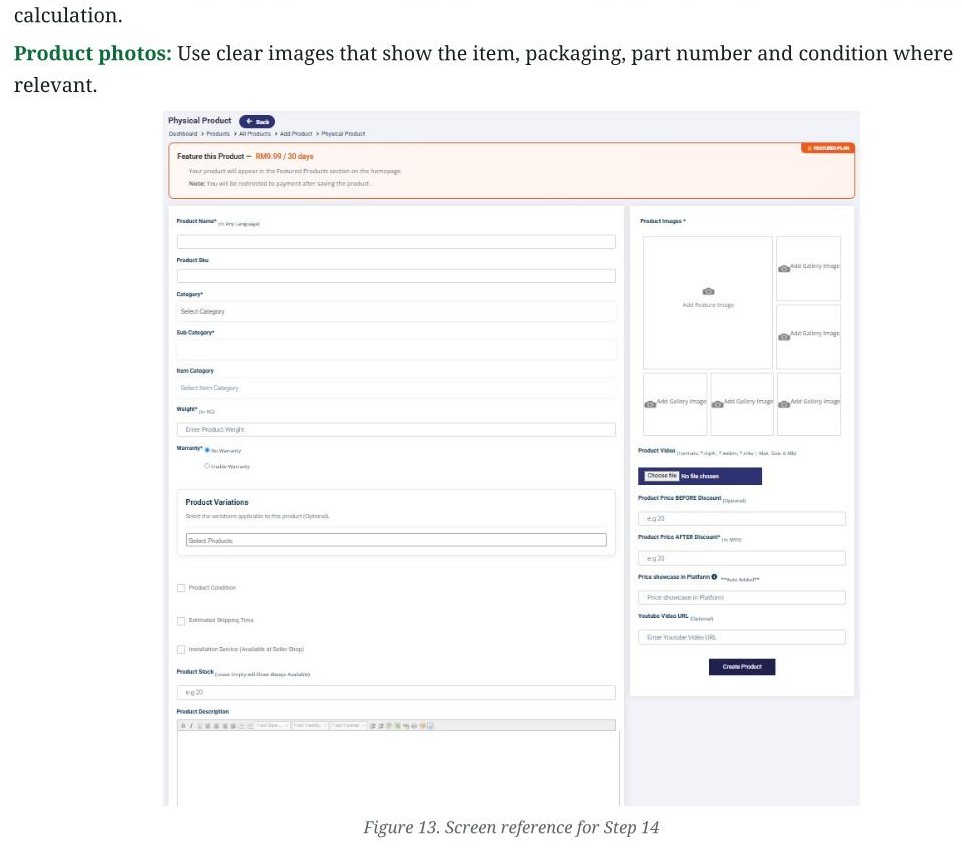
Enter the product information
Complete the product listing with an accurate product name, category, description, images, stock, price, dimensions and all other required information shown on the form.
Product weight is compulsory: Enter the actual packed shipping weight whenever possible. If the exact weight is not available, use the closest reasonable estimate because weight affects the delivery charge calculation.
Product photos: Use clear images that show the item, packaging, part number and condition where relevant.
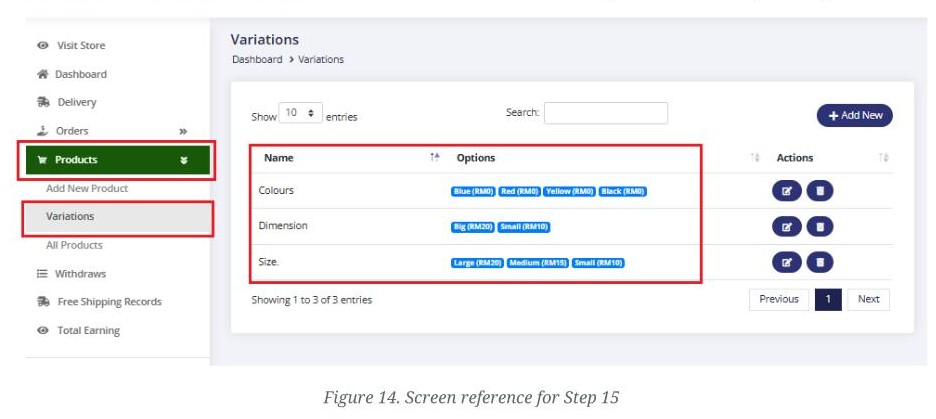
Set up product variations
Open Products > Variations to review or create variant labels that match the product. Common examples include Colour, Size, Dimension, Model, Brand or Condition. Edit the labels based on what customers need to choose.
Use variations only when needed: Do not create a variation if the product has only one option.
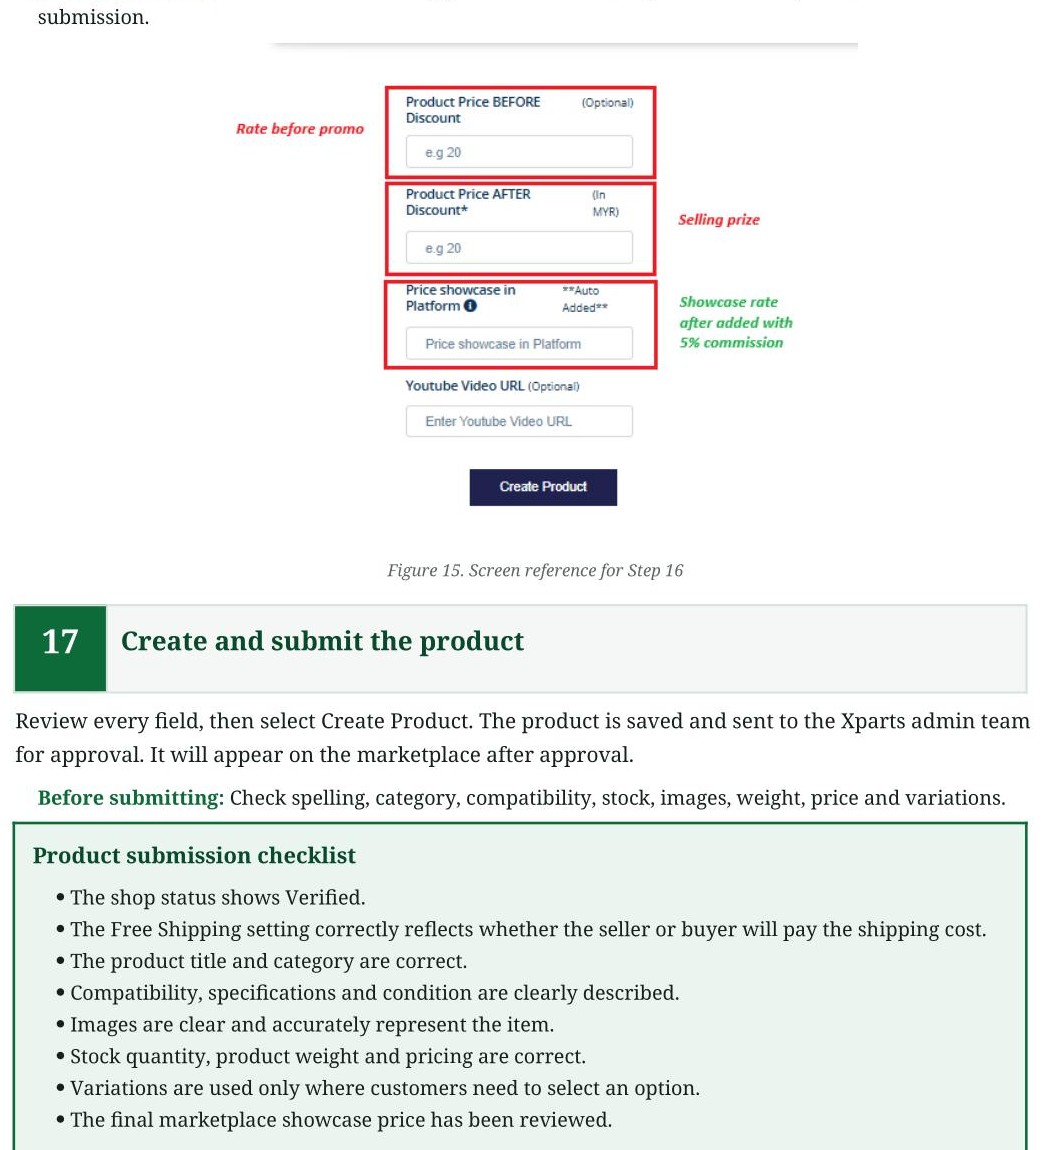
Review the pricing fields
Enter the original price before discount only when applicable, then enter the selling price after discount. Review the Price showcase in Platform field, which displays the final marketplace price after the platform's applicable commission or pricing adjustment.
Final price check: Confirm that the selling price and the marketplace showcase price are correct before submission.
Create and submit the product
Review every field, then select Create Product. The product is saved and sent to the Xparts admin team for approval. It will appear on the marketplace after approval.
Before submitting: Check spelling, category, compatibility, stock, images, weight, price and variations.
Product submission checklist
- The shop status shows Verified.
- The Free Shipping setting correctly reflects whether the seller or buyer will pay the shipping cost.
- The product title and category are correct.
- Compatibility, specifications and condition are clearly described.
- Images are clear and accurately represent the item.
- Stock quantity, product weight and pricing are correct.
- Variations are used only where customers need to select an option.
- The final marketplace showcase price has been reviewed.
Quick troubleshooting
| Issue | What to check |
|---|---|
| Verification email not received | Check Spam/Junk, confirm the registered address and request a new email if the option is available. |
| Shop still shows Not Verified | Confirm that all required fields and documents were saved, then allow time for admin review. |
| Document upload fails | Try a clear PDF, JPG or PNG file with a smaller file size and a simple filename. |
| Delivery price appears incorrect | Recheck the packed product weight and dimensions entered in the listing. |
| Wrong party is charged for shipping | Check the Free Shipping for My Products switch: ON means the seller pays; OFF means the buyer pays. |
| Product is not visible in the marketplace | Check whether the product is still pending admin approval or requires correction. |