Installation Panel Registration & Listing Guide
A complete step-by-step guide—from account registration and membership payment to creating your installation panel listing.
Before you begin
- Prepare an active email address that is not already registered as an Xparts seller account.
- Prepare the panel name, full branch address, telephone number and operating hours.
- Prepare clear photos of the workshop or service premises and an optional promotional video.
- Prepare relevant supporting documents, such as SSM registration, permits or shop licences.
- Prepare a valid card, wallet or FPX online-banking method for the RM88 membership payment.
One subscription covers one installation panel branch listing.
Create and activate the panel account
Register the account as an Installation Panel, verify the email address and sign in to the dedicated panel dashboard.
Open the panel login page
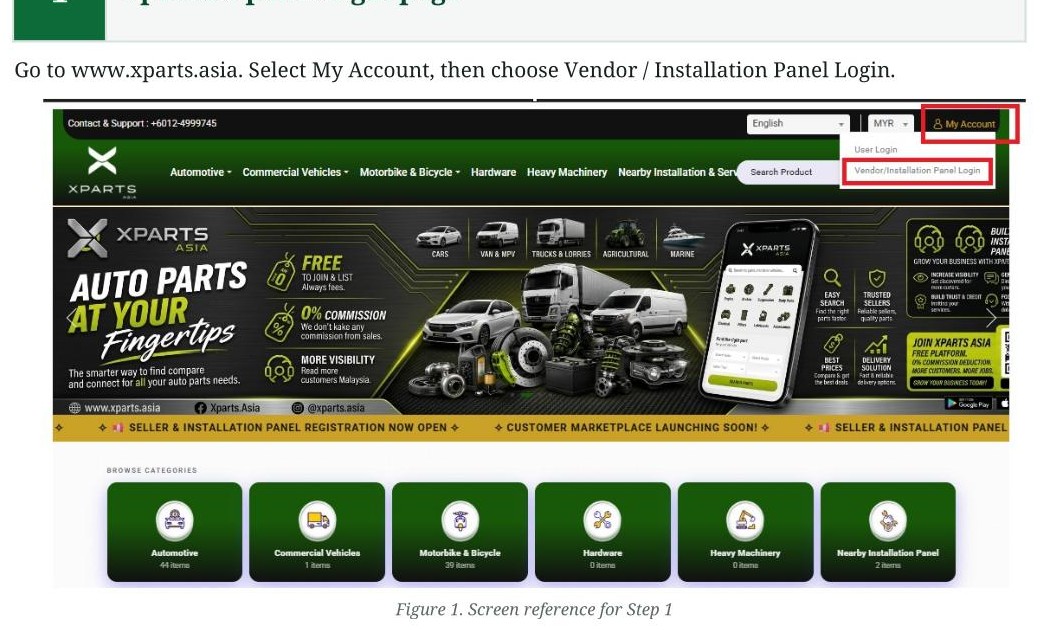
Go to www.xparts.asia. Select My Account, then choose Vendor / Installation Panel Login.
Register as an Installation Panel
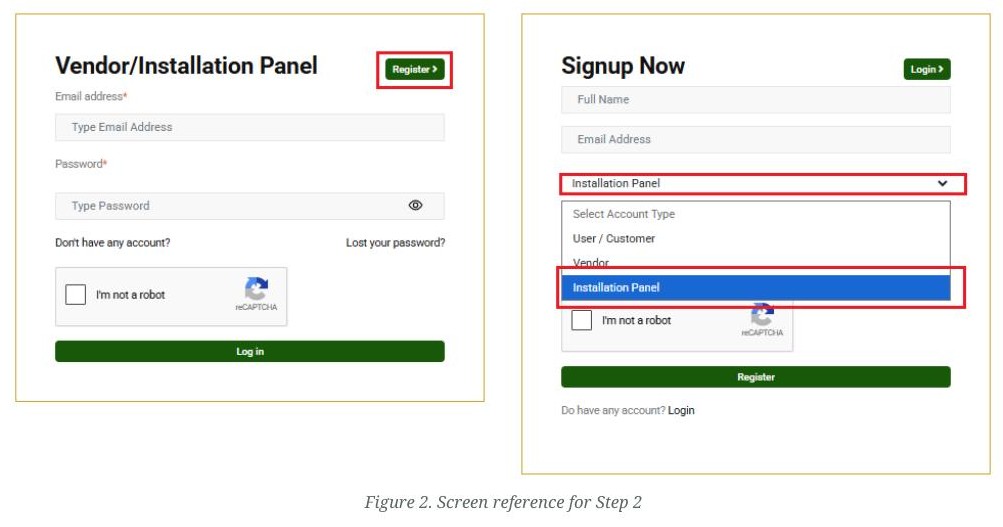
Select Register. Enter your full name and active email address, choose Installation Panel as the account type, complete the "I'm not a robot" check, and select Register.
Important: The same email address cannot be used for both a Seller account and an Installation Panel account.
Verify the registered email address
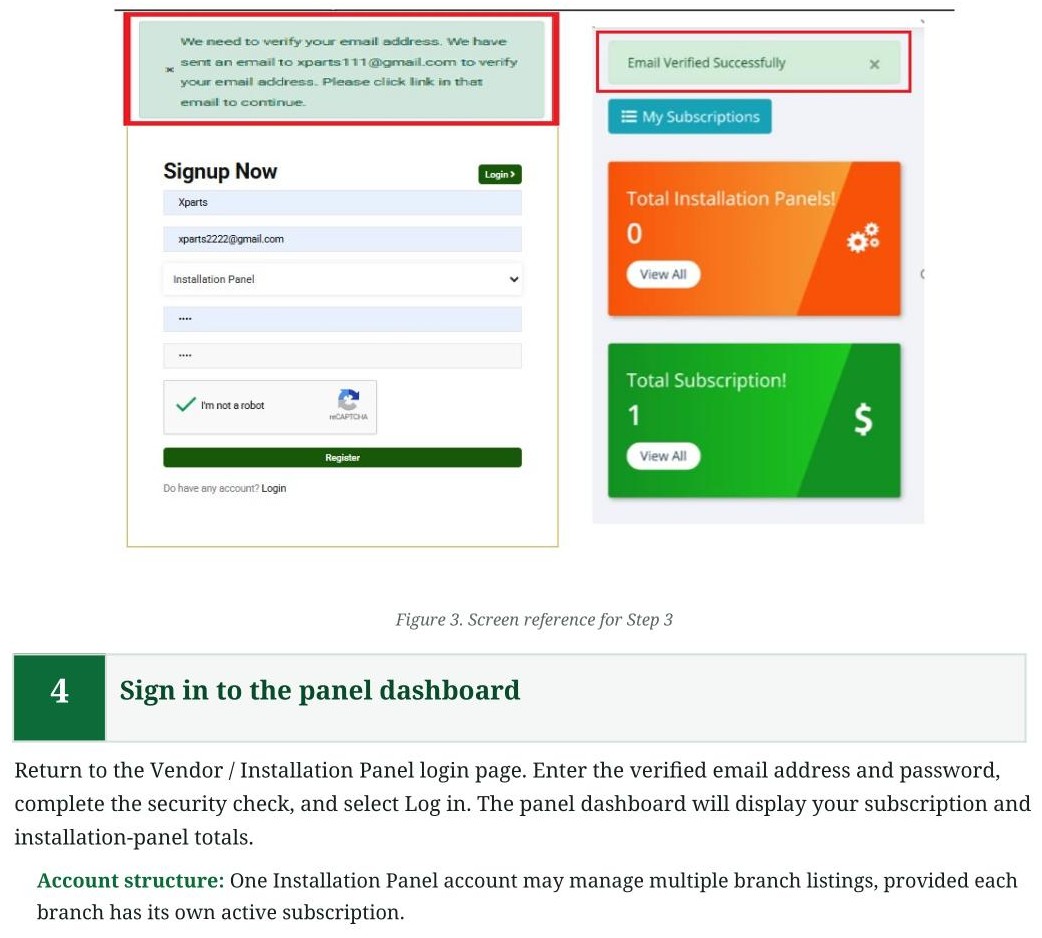
Check the inbox for the email address used during registration. Open the Xparts verification email and select the verification link. A successful confirmation message will appear after the email is verified.
If the email is missing: Check the Spam or Junk folder and confirm that the registered email address is correct.
Sign in to the panel dashboard
Return to the Vendor / Installation Panel login page. Enter the verified email address and password, complete the security check, and select Log in. The panel dashboard will display your subscription and installation-panel totals.
Account structure: One Installation Panel account may manage multiple branch listings, provided each branch has its own active subscription.
Purchase the annual panel membership
Select the RM88 promotional plan, confirm the checkout details and complete payment using an available payment method.
Select the Installation Panel plan
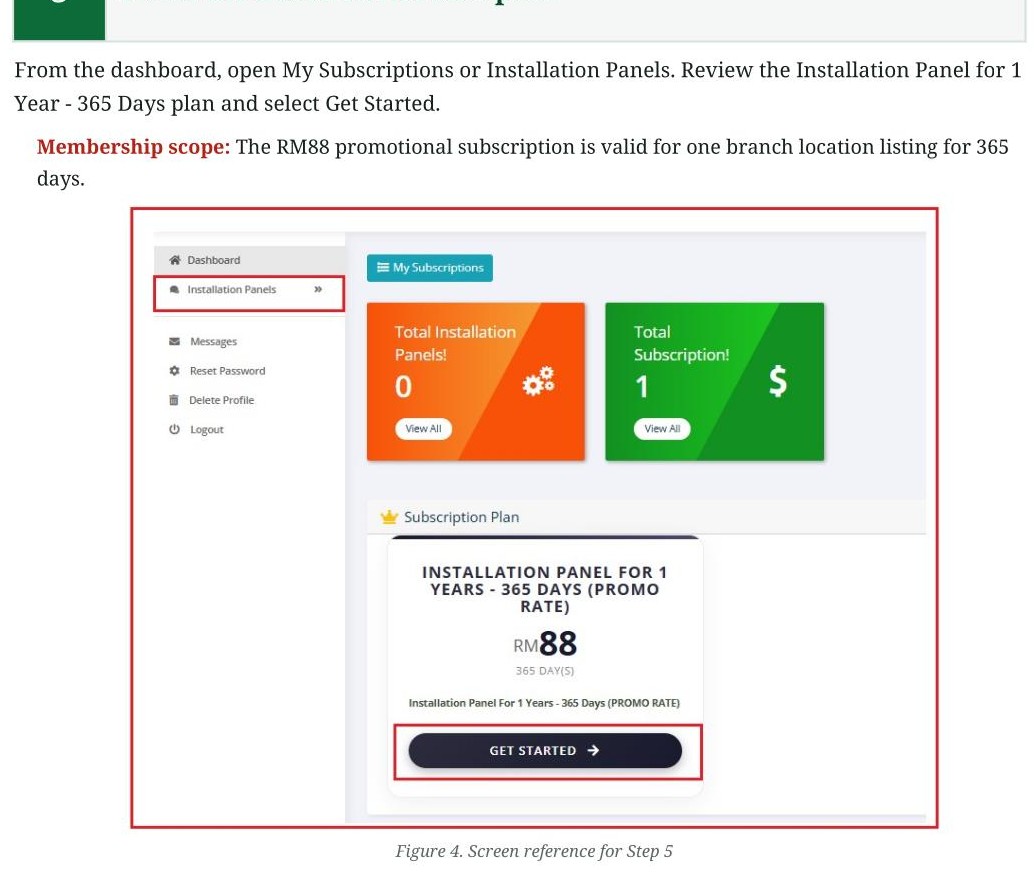
From the dashboard, open My Subscriptions or Installation Panels. Review the Installation Panel for 1 Year - 365 Days plan and select Get Started.
Membership scope: The RM88 promotional subscription is valid for one branch location listing for 365 days.
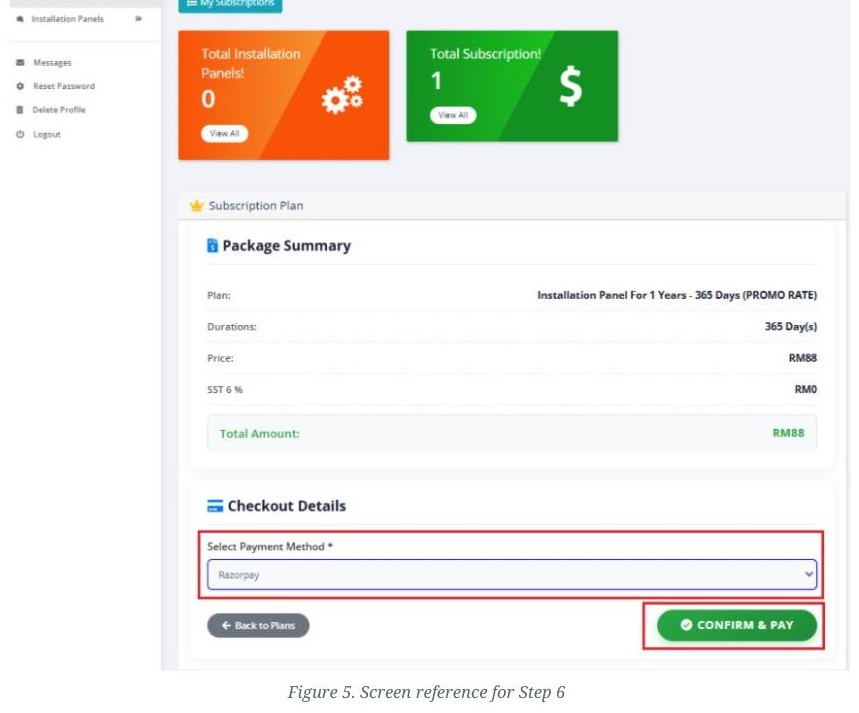
Confirm the package and payment gateway
Review the package summary, duration and total amount. Under Checkout Details, select the payment method displayed in the portal, then choose Confirm & Pay.
Price check: Confirm that the amount displayed is RM88 before proceeding.
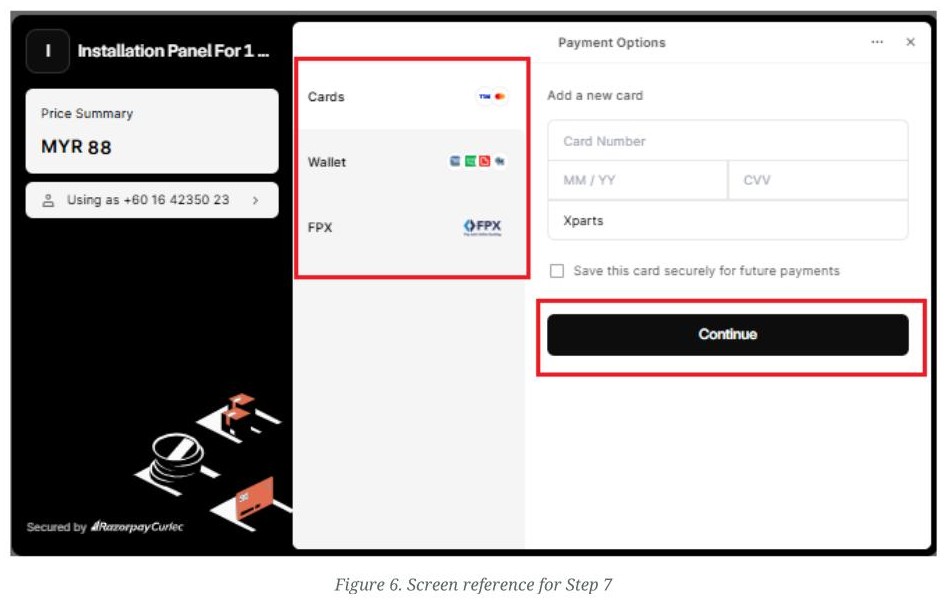
Complete the payment
Choose one of the payment options available on the payment screen, such as Cards, Wallet or FPX. Enter the required information and select Continue to complete the payment securely.
Security reminder: Never share your online-banking password, card PIN or one-time password with another person.
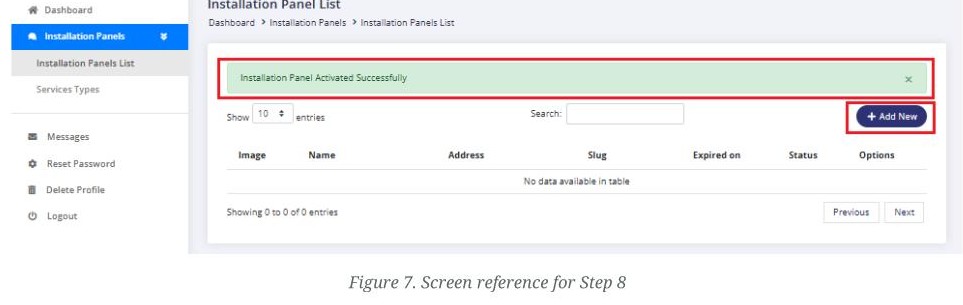
Confirm activation and add a panel
After successful payment, the portal displays Installation Panel Activated Successfully. Open Installation Panels and select Add New to create the branch listing covered by the subscription.
Payment record: Keep the payment confirmation or receipt for your records.
Create the installation panel listing
Add complete branch information, service categories, media, availability and supporting documents before submitting the listing for review.
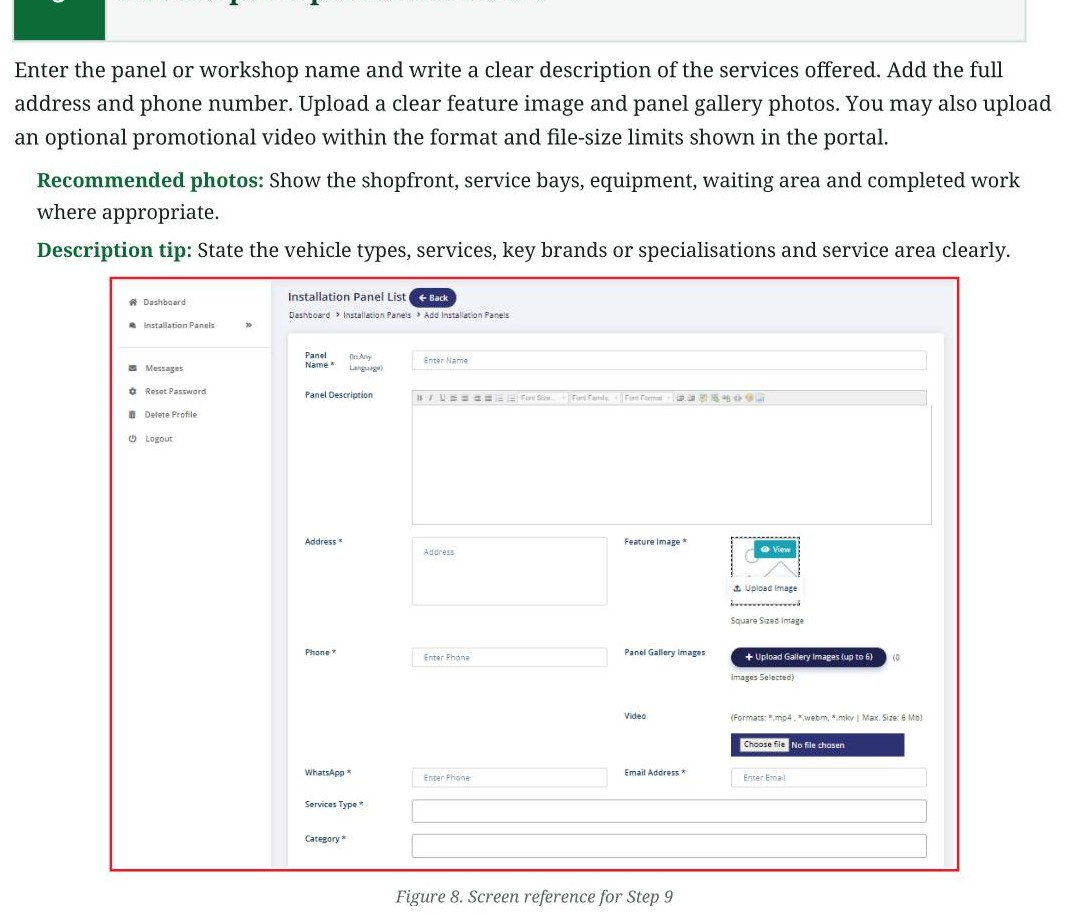
Add the panel profile and media
Enter the panel or workshop name and write a clear description of the services offered. Add the full address and phone number. Upload a clear feature image and panel gallery photos. You may also upload an optional promotional video within the format and file-size limits shown in the portal.
Recommended photos: Show the shopfront, service bays, equipment, waiting area and completed work where appropriate.
Description tip: State the vehicle types, services, key brands or specialisations and service area clearly.
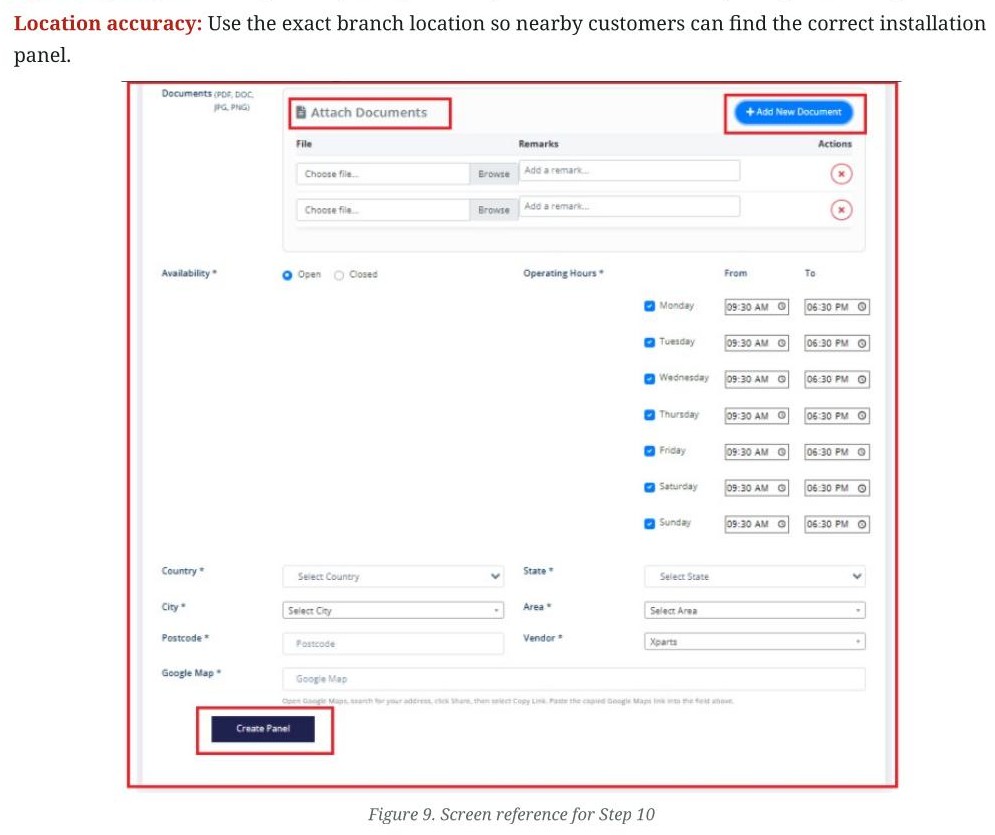
Complete services, hours and location details
Continue through the form and complete all required fields. Select the appropriate service type and category, add the panel website and email address if available, set availability and operating hours, and complete the country, state, city and area fields.
Operating hours: Tick only the days the panel is open and enter accurate opening and closing times.
Location accuracy: Use the exact branch location so nearby customers can find the correct installation panel.
Add the Google Maps share link
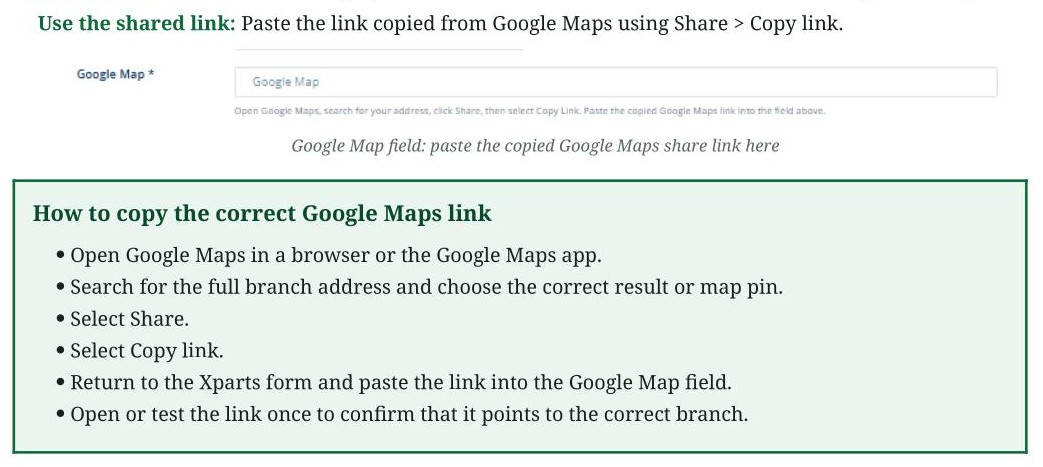
Open Google Maps and search for the panel's complete branch address. Select the correct shop location or map pin, click Share, then choose Copy link. Return to the Xparts panel form and paste the copied Google Maps share link into the Google Map field.
Important: Confirm that the map opens at the correct branch location before submitting the listing.
Use the shared link: Paste the link copied from Google Maps using Share > Copy link.
Upload supporting documents
In Attach Documents, select Choose File and upload the relevant SSM registration, permit, licence or other supporting document. Add a clear remark for each file and use Add New Document when more than one file is required.
Document quality: Use current, readable files. Avoid blurred, cropped or expired documents.

Create and submit the panel
Review the complete listing, then select Create Panel. The submission is sent to the Xparts admin team for approval. The panel listing becomes available on the platform after approval.
Before submission: Check the panel name, branch address, Google Maps link, phone number, services, hours, photos, video and documents.
Important membership and account rules
- Each RM88 annual subscription is valid for one branch location listing only.
- For an additional branch, purchase another subscription and create a separate panel listing.
- One Installation Panel account may be used to manage multiple subscribed branch listings.
- An email address registered as an Installation Panel cannot also be used as a Seller account email.
- The panel listing is for service visibility and direct customer contact; Xparts does not place or manage service job orders for the panel.
- The panel deals directly with the customer for service enquiries, appointments, quotations and payment.
Final submission checklist
- Membership payment is successful and the subscription is active.
- The correct branch name, address and telephone number are entered.
- Service types and categories accurately represent the panel's work.
- Operating days and hours are current.
- The Google Maps share link opens the correct branch location.
- Feature image and gallery photos are clear and relevant.
- The optional promotional video meets the portal requirements.
- SSM registration, permits or licences are readable and current.
- All required fields marked with an asterisk (*) are completed.
Quick troubleshooting
| Issue | What to check |
|---|---|
| Verification email not received | Check Spam/Junk, confirm the registered address and request a new verification email if available. |
| Cannot use the email address | The email may already be registered as a Seller or Installation Panel account. Use the correct login or another email. |
| Payment does not complete | Confirm the selected payment method, account balance or card details, then retry or use another available option. |
| Cannot add another branch | Purchase an additional subscription because each branch location requires its own active membership. |
| Map opens the wrong location | Search the full branch address again in Google Maps, select the correct pin, then use Share > Copy link and replace the link in the form. |
| Panel is not visible | Check whether the listing is still pending admin approval or requires correction. |